Sunday, August 26, 2012

How to Fix Your WDCC Figure

Hi All, Here's a tutorial on how to fix that WDCC (Walt Disney Classics Collection) figurine that you've been hiding away because it's broken. WDCC pieces are known for their quality, attention to detail, hand painting and fragility!

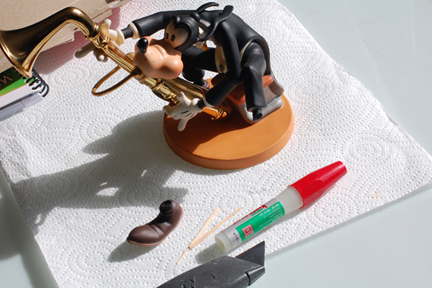
The Disney Husband won this piece on Ebay a while back. It is called "Goofy's Grace Notes." It came to us with a broken foot. (Thank goodness for insurance) My sweet and long suffering husband has been begging me to fix Goofy for a long time now and I thought I'd do a post about the process.


Step One: Gather all your supplies together. It's best to have everything together in one place at the start! A big soft brush for wiping the pieces down, a small paint brush, magic markers and a tin of water colors so you can match up to the colors you are gluing together, a small cup of water, toothpicks, plastic gloves, paper towels, crazy glue/super glue, and an old piece of cardboard or a piece of junk mail with a cellophane window is best for this job. This is where we will be squirting our glue.


Step Two: Clean off your pieces with a soft brush, or whatever you use to dust your valuable figurines. Please make sure the ferrule of your brush doesn't scratch the paint on your figure. The longer and softer the bristles, the better. Once all parts are clean and free of dust, we're onto the next step.

Step Three: Here's the fun part! Coloring in the (broken) white areas that need to be filled with color before we start gluing. If you try to do this after the piece is glued, you'll find that the glue won't take the color, and the break(s) will be much more noticeable. In my case all I needed was a black marker and some brown watercolor which I hand mixed to match the shoe as closely as possible. The small paintbrush was able to get into the incredibly tiny cracks that the marker just could not get into!


Step Four: Make sure you know how the pieces go together. Get the feel and sight of how the pieces go together in your memory, because once they are glued, it's hard to go back!


Step Five: Preparing to Glue. Take a breath, you can do this! If you have a fear of crazy/super glue, I don't blame you! It really does glue skin together and even though nail polish remover will eventually separate your fingers, or what-have-you, your skin is left feeling awful for quite a while! That's what your junk mail envelope is for, or a piece or cardboard. Squeeze a glob of glue onto the cellophane envelope window and you will have plenty of time to work with it. It does not dry immediately by itself.  (Uuhh, I used the back of the glue packaging, the directions actually, not too bright)


Before I go any further, you may have noticed that I have two different bottles of glue in these photos, if you did, Bravo! Make sure you always start out with a fresh bottle of glue! The first bottle of glue I had to cut right through the bottle with a utility knife, (I don't ever suggest doing this unless you are fearless) and it was dry the whole way through! We have so many bottles of this stuff around the house, how come we can't find any when we really need it?


I put a glove on one hand and dipped my toothpick into the glue and tapped the glue onto Goofy's foot. If you get too much glue onto your piece, use the edge of your paper towel to absorb some of the excess. I fit the two pieces together and held them lightly together for about thirty seconds. I did not have a glove on the other hand because I didn't want to lose any control of the fitting. I let the glue cure for a couple of hours and he's acceptable to the Husband.

If anyone has any ideas about how to fill the open cracks in, let me know. I hope you enjoyed this tutorial, and were inspired to fix your own figurines! Good luck.

Tuesday, July 31, 2012

Just Dance!

My last post was about my Disney Husband dancing with joy in Epcot; which got me thinking about how many other photos I had of people dancing spontaneously around Disney! I knew we had a couple so I went through all of our digital files. Most of the photos of are the two of us.
Here I am cha-cha-cha-ing with Tigger. Who knew he knew the classics?
 
Here's an awesome photo of an anonymous fellow kicking up his heels while walking past a show of Off Kilter's. 
The hills are alive, with that crazy dancing twirly girl...
Our friends, Tom, Derrick and Dylan dancing at the Beirgarten. Not as spontaneous because there's a dance floor and band ready for anyone who wants to dance, but the photo was too good not to include.

And my favorite spontaneous dancing session, Jill and Tigger, freestylin' it. Truly a joyful moment. So do any of you out there have any spontaneous dancing captured on film?


Wednesday, July 18, 2012

The Happy Dance

If you see this guy in Disney, stop him and say hi! He is the "Happiest Guy on Earth" when he's in his happy place. In fact, why don't you join him while he does his "Happy Dance?" They say you can never dance enough in your lifetime.


Monday, July 9, 2012

Umbrellas

It's that time of the year down in Disney World, when the days are sweltering hot and the sun beats down on you. There's no escaping it unless you can find some indoor activities, but that's not why you went to Disney! Thankfully, one can find many shady spots, and if not, vendors selling fun, fantastic umbrellas.

Wednesday, June 27, 2012

Would We Do it Again?

So, one might ask, would I take a Disney cruise again? And as you can see by the photos below, the Disney Husband looks ecstatic about something. Yes. He booked the next cruise on this past one; it saves us a percentage off and we get a two hundred dollar ship credit as well. Always looking to be as frugal as possible, this appealed to my sensibilities.

 And it made him happy! That's what counts! We'll go somewhere warm next time.


Tuesday, June 19, 2012

What We Saw

We saw many amazing things on our cruise on the Disney Wonder, and the excursions we took off the ship. Here are some of the highlights, in no particular order. Whales, mostly their tails, lots of them!

Blue snow! Who knew there was such a thing? Here's what we learned: freshly fallen snow contains large amounts of trapped air which reflects white light directly back to our eyes. As the snow settles, the individual flakes change from crystals to rounded grains of ice. The weight of new snow piling on these grains presses them together, reducing the air even more between them. In time, the compacted ice grains form a solid mass of ice. When light strikes this mass it is bent or refracted inside the solid ice. Only the blue spectrum is transmitted back to our eyes! Thanks to the Mendenhall Glacier Visitors Center for that information.

We made it to Alaska's Capitol building in Juneau. We had to take a taxi because our ship made it into port much later than expected due to stormy weather the evening before.


We made it back to the ship and then disembarked for our Disney excursions: whale watching and the Mendenhall Glacier.
More glaciers!

We saw a lot of the local wildlife; lots of bald eagles, seals, sea lions, the whales, as seen above...
Oh, and on one of our excursions, the "Rainforest Wildlife Sanctuary Raptor Center and Totems Walk" where we were supposed to see scads of wildlife, here's what we saw:

Yes, that's right. Two, yes, two wild Banana Slugs. Yeah, that's right! I know you're all jealous. We braved a hike in a pouring rainstorm for those slugs in all their splendor! The owl and eagle were recuperating in the Bird Sanctuary at the end of the trail.
We took an awesome train ride from Skagway, the White Pass and Yukon Route, which I believe was our best off ship (non-Disney) excursion. The White Pass climbs almost 3000 feet in just 20 miles, includes cliff-hanging turns, two tunnels and numerous bridges and trestles. When it was constructed in 1901, the steel cantilever bridge was the tallest of its kind. Disney husband and I had a great time on this ride!
Look how deep the snow was at the top! This is a photo of the train next to a snowbank.
And of course, we saw characters!