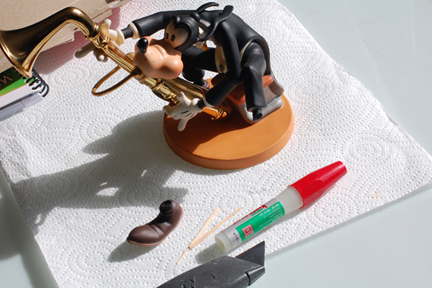
Hi All, Here's a tutorial on how to fix that WDCC (Walt Disney Classics Collection) figurine that you've been hiding away because it's broken. WDCC pieces are known for their quality, attention to detail, hand painting and fragility!
The Disney Husband won this piece on Ebay a while back. It is called "Goofy's Grace Notes." It came to us with a broken foot. (Thank goodness for insurance) My sweet and long suffering husband has been begging me to fix Goofy for a long time now and I thought I'd do a post about the process.
Step One: Gather all your supplies together. It's best to have everything together in one place at the start! A big soft brush for wiping the pieces down, a small paint brush, magic markers and a tin of water colors so you can match up to the colors you are gluing together, a small cup of water, toothpicks, plastic gloves, paper towels, crazy glue/super glue, and an old piece of cardboard or a piece of junk mail with a cellophane window is best for this job. This is where we will be squirting our glue.
Step Two: Clean off your pieces with a soft brush, or whatever you use to dust your valuable figurines. Please make sure the ferrule of your brush doesn't scratch the paint on your figure. The longer and softer the bristles, the better. Once all parts are clean and free of dust, we're onto the next step.
Step Three: Here's the fun part! Coloring in the (broken) white areas that need to be filled with color before we start gluing. If you try to do this after the piece is glued, you'll find that the glue won't take the color, and the break(s) will be much more noticeable. In my case all I needed was a black marker and some brown watercolor which I hand mixed to match the shoe as closely as possible. The small paintbrush was able to get into the incredibly tiny cracks that the marker just could not get into!
Step Four: Make sure you know how the pieces go together. Get the feel and sight of how the pieces go together in your memory, because once they are glued, it's hard to go back!
Step Five: Preparing to Glue. Take a breath, you can do this! If you have a fear of crazy/super glue, I don't blame you! It really does glue skin together and even though nail polish remover will eventually separate your fingers, or what-have-you, your skin is left feeling awful for quite a while! That's what your junk mail envelope is for, or a piece or cardboard. Squeeze a glob of glue onto the cellophane envelope window and you will have plenty of time to work with it. It does not dry immediately by itself. (Uuhh, I used the back of the glue packaging, the directions actually, not too bright)

Before I go any further, you may have noticed that I have two different bottles of glue in these photos, if you did, Bravo! Make sure you always start out with a fresh bottle of glue! The first bottle of glue I had to cut right through the bottle with a utility knife, (I don't ever suggest doing this unless you are fearless) and it was dry the whole way through! We have so many bottles of this stuff around the house, how come we can't find any when we really need it?
I put a glove on one hand and dipped my toothpick into the glue and tapped the glue onto Goofy's foot. If you get too much glue onto your piece, use the edge of your paper towel to absorb some of the excess. I fit the two pieces together and held them lightly together for about thirty seconds. I did not have a glove on the other hand because I didn't want to lose any control of the fitting. I let the glue cure for a couple of hours and he's acceptable to the Husband.
If anyone has any ideas about how to fill the open cracks in, let me know. I hope you enjoyed this tutorial, and were inspired to fix your own figurines! Good luck.